Draw a Circle on a Powerpoint Slide
Try Using the Pen and Highlighter Ink Tools to Draw on Slides and Focus Attention during PowerPoint Shows
by Avantix Learning Team | Updated April 15, 2021
Applies to: Microsoft ® PowerPoint ® 2010, 2013, 2016, 2019 and 365 (Windows)
You can access PowerPoint's ink annotation tools including a pen and a highlighter during a slide evidence to focus attention or write on slides. These tools take been around for a while and you can employ them in previous versions of PowerPoint.
Using the ink note tools, you lot tin can create an interesting digital whiteboard or blackboard outcome with the pen and/or highlighter. Simply press B for black screen or W for white screen during a prove and and then use the ink annotation tools.
These slide show tools can be used on the fly during a slide show. If you want to use similar effects every time yous run a specific presentation, consider creating drawing objects and animating them or employ the annotation tools in the Draw tab in the Ribbon in Normal View.
After you lot display the Pen or Highlighter during a show, if yous desire to return to the Pointer arrow, press Ctrl + A or press ESC.
Recommended commodity: How to Insert a Video in PowerPoint (from a File on Your PC or Shared Bulldoze)
Practise you want to learn more than about PowerPoint? Check out our virtual classroom or in-person PowerPoint courses >
Drawing on slides using the Pen during a slide show
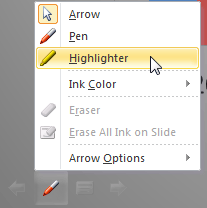
You can utilise the Pen to draw on slides during a slide bear witness. Information technology's easily accessed through the context menu (below) during a slide show:

To use the Pen and draw on a slide during a slide show:
- Open an existing presentation.
- Click Slide Show on the lesser right to run the show (or press F5).
- In Slide Testify Manner, right-click to display the context menu (or press Shift + F10).
- Click Arrow Options and so select Pen. The cursor changes to a small colored dot (the default color of the Pen tool is red).
- Drag to draw or write on the slide.
- Press ESC when you lot're finished using the Pen.
Y'all can as well press Ctrl + P to display the Pen when you lot're running a show without using the drop-down menu. Ctrl + P volition as well plow the Pen off.
Irresolute the color of the Pen
To change the color of the Pen:
- In Slide Show Mode, correct-click to brandish the context menu (or press Shift + F10).
- Select Pointer Options from the drop-downward bill of fare.
- Select Ink Color from the sub-card and then select a color. There are 2 types of colors – Theme Colors and Standard Colors. Theme colors may differ every bit they are afflicted by the Theme for the presentation simply Standard Colors volition always contain the same 10 colors for all presentations.
- Display the pen and describe as usual.
Cartoon on slides using the Highlighter during a slide show
The Highlighter is unlike from the Pen. It creates lines that beginning out in yellowish, are semi-transparent and are thicker than lines created with the Pen tool. You can access the Highlighter using the context carte du jour (below) during a slide show.
To apply the Highlighter and draw on a slide during a slide bear witness:
- Open an existing presentation.
- Click Slide Testify on the bottom right to run the bear witness (or printing F5).
- In Slide Prove Fashion, right-click to display the context menu (or press Shift + F10).
- Select Pointer Options and so Highlighter. The cursor changes to a yellow line (the default colour of the Highlighter tool is yellow).
- Drag to draw or write on the slide.
- Printing ESC when you're finished using the Highlighter.
Yous tin can also printing Ctrl + I to display the Highlighter when you lot're running a bear witness without using the drop-down carte. Ctrl + I will also turn the highlighter off.
Irresolute the color of the Highlighter
To modify the colour of the Highlighter:
- In Slide Show Mode, right-click to display the context menu (or printing Shift + F10).
- Select Arrow Options from the drib-down card.
- Select Ink Color from the sub-menu and and then select a color. There are 2 types of colors – Theme Colors and Standard Colors. Theme colors may differ as they are affected by the Theme for the presentation but Standard Colors will always contain the same 10 colors for all presentations.
- Display the highlighter and depict as usual.
Erasing or hiding ink annotations in Slide Show view
When you are working with ink annotations with the Pen or Highlighter in Slide Testify Manner, you can use the following shortcuts to erase or hibernate ink annotations:
- Printing E to remove all annotations on the slide.
- Printing Ctrl + Due east to modify to the Eraser tool then elevate over annotations to erase them. Press Escape when you're finished using the Eraser.
- Press Ctrl + M to show or hibernate all annotations.
Y'all can as well use the menus y'all used earlier to select the Eraser.
Keeping or discarding ink annotations
When you press the ESC to end a evidence, a message will appear request if you want to continue your annotations:
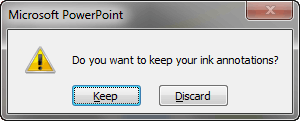
It's a proficient idea to click the Keep rather than the Discard button since in that location's no style of recovering annotations if you choose Discard. If you keep annotations, PowerPoint refers to them as ink.
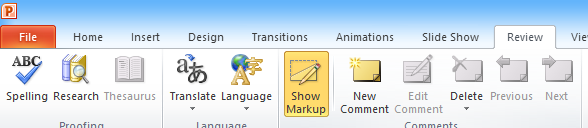
Deleting ink annotations in Normal View
If you decided go along ink annotations, they go objects on your slides.
To delete them in Normal View:
- Click the Review tab on the Ribbon.
- Click Delete in the Comments group so select an option from the drop-down menu. If y'all choose Delete All Markup on the Electric current Slide, PowerPoint deletes all ink on the electric current slide. If you select Delete All Markup in This Presentation, PowerPoint deletes all ink on all the slides in your presentation.
Formatting ink annotations in Normal View
If you accept called to continue annotations, you can format them in Normal View:
- Click an ink annotation.
- Click the Ink Tools Pens tab in the Ribbon.
- Click Select Objects.
- Select the ink object(s) you want to format.
- Cull the desired options from Ink Tools Pen tab in the Ribbon.
Ink annotations are easy to use in presentations just you may have issues if the slides have animations on them.
This article was offset published on April 16, 2016 and has been updated for clarity and content.
Subscribe to get more manufactures like this 1
Did yous detect this article helpful? If you would similar to receive new manufactures, bring together our email list.
More than resources
How to Compress Images in PowerPoint (10 Means)
Where to Find Free Images for Your PowerPoint Presentations
How to Loop a PowerPoint Slide Show to Repeat Automatically
PowerPoint Shortcuts Y'all Can Utilise During a Slide Testify (l+ Shortcuts)
Related courses
Microsoft PowerPoint: Introduction
Microsoft PowerPoint: Intermediate / Advanced
Microsoft PowerPoint: Blueprint for Non-Designers
Microsoft PowerPoint: Animations Bootcamp
VIEW More than COURSES >
Our instructor-led courses are delivered in virtual classroom format or at our downtown Toronto location at 1 Yonge Street, Suite 1801 (Toronto Star Building), Toronto, Ontario, Canada (some in-person classroom courses may also be delivered at an alternate downtown Toronto location). Contact us at info@avantixlearning.ca if you'd like to arrange custom onsite training or an online course on a date that's user-friendly for you.
Copyright 2022 Avantix ® Learning
Microsoft, the Microsoft logo, Microsoft Office and related Microsoft applications and logos are registered trademarks of Microsoft Corporation in Canada, United states of america and other countries. All other trademarks are the property of the registered owners.
Avantix Learning | i Yonge Street, Suite 1801 (Toronto Star Building), Toronto, Ontario, Canada M5E 1W7 | info@avantixlearning.ca
Source: https://www.avantixlearning.ca/microsoft-powerpoint/how-to-draw-on-slides-on-the-fly-during-a-powerpoint-presentation-training-courses/
0 Response to "Draw a Circle on a Powerpoint Slide"
Post a Comment